General Protocols
Orientation
Motel Mate is a set of relational databases written within a programme called
Filemaker.
When you first open Motel Mate will be prompted to login as a general
user or manager. Depending on your account you will
be presented with a menu either headed Front desk Menu or Manager
Menu. However as the Manager Menu encompasses all features, this manual
will refer to MotelMate as if the user has logged in as 'Manager'.
Starting MotelMate ![]()
Use the shortcut/alias on your desktop to open MotelMate. You will be prompted
for a password. There a several levels of password each of which will have
various restrictions depending how you have set them up in the user
login accounts in the Adv Options.
Filemaker protocols
MotelMate is built upon Filemaker software. The programme is designed so that
the data is saved once it has been entered into a particular field. This means
that should anything happen while you are working on MotelMate, such as the
power being switched off, then you can rest assured that your data will still
be intact once you've restarted.
Layouts
One of the first things you will want to do when you open MotelMate is navigate
the various screens, called layouts. Using these layouts, you can view records,
enter data into fields, view reports and more.
There are two important work areas to distinguish from one another in MotelMate:
the Status Area on the left hand side and the main
Layout area on the right.
Screens
In MotelMate each of the tabs such as Home, Guests, Companies, Bookings when
clicked open are a typical layout. These show the relevant field names and the
field to be filled in with your data.
The Sta tus
Area
The Status area serves as a primary control centre for MotelMate.
In Browse Mode this is where most data entry and general use occurs.
Note the various functions of the Status Area in Browse mode. To jump to a specific
record, type a number into the record number field and press Enter.
In the Status Area there is a picture of a little notebook in the top left corner
of the screen which relates to the records in the database. This notebook will
assist you in organising the information you wish to view.
In the example shown here, there are 434 records in total.
However we currently have a 'found' set of 42 of which we are
currently on record 1. To move through the records you can
either click on the pages of the note book to move one at a time, or click and
drag the blue slider under neath it.
It is also possible to move forward or backward through records by holding down
the Command key (Mac) or Control key (windows) and pressing the Up or Down arrows
on the keyboard.
If you are in a 'found set' and wish to view all records (perhaps you are in a list view of some sort) then the shortcut key to Show all Records is Ctrl + J.
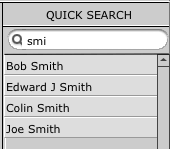
Quick
search
On many of the layouts you will find a Quick Search facility. To use this all
you need to do is type in part or all of a name or business and hit Enter or
simply click away (onto an empty part of the page). You will get a list of records
immediately below relating to this 'find'. Just click on the name that you want
to be taken it's relevant record.
