From the FRONT DESK main menu click on the Grid tab.
How do I make a new booking?
Booking grid
From the FRONT DESK main menu click on the Grid tab.
![]()
![]() The
booking grid provides a clear, graphical display of existing bookings, colour
coded depending on their status.
The
booking grid provides a clear, graphical display of existing bookings, colour
coded depending on their status.
Clicking on an existing booking will allow you to check out a guest or take
you to a booking details page which can be edited. A new booking can be entered
by simply clicking on an empty space on the grid.
To view a different time period you can click on the date in the top left hand
corner and select from the calendar.
The Web Sites button (bottom right) will take you to
the Holiday Guide website where you can view your motel’s booking status
online.
This will be displayed as a split screen with your own bookings on top and Holiday
Guide underneath (see Web Updates
)
Make a new booking
New bookings can also be entered on this grid by clicking and dragging.
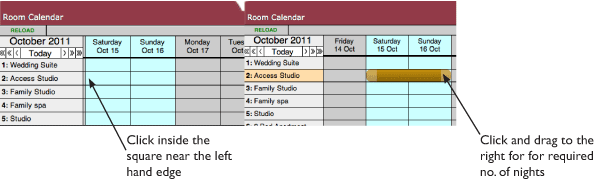
As soon as you release the mouse you will be taken to the New Booking Details screen.
If it is a new booking and the customer has had a history with the motel then you can simply select their name from the Client Account search menu on the left. All the corresponding information will fill in automatically.
If, however it is a new customer then click on the Make
a New Client button at the base of this portal.

All the data fields will now allow you to manually type in the data. This information
will also be kept in the customer database for future bookings, correspondence
etc.
Once all data has been entered then press the 'Make Booking'
button. ![]()
Enter your initials in the following screen to reord who made the booking.
Holiday Guidewill then be updated automatically
You will then be taken to the Booking details screen.
From this screen you can change booking details to do with extra services or items. You can also change the booking status to ‘confirmed’, ‘checked in’ and ‘checked out’. The actual dates, duration and room number can also be changed in the Change Bookings section in the bottom left. You can also split a bill between two bookings (Part Booking) and print an invoice preview for the customer (Pro Forma).
Booking Page Buttons
![]()
This will change the status of the booking to 'confirmed'. You will be presented
with a pre-formatted confirmation letter which can be set up in the Mailmerge
setups, Adv Options in the Manager menu.
![]()
The check in button will change the booking staus from 'confirmed' to 'checked
in'. A checking in form will appear as it is usual for the gust to fill one
out at this point.

At this point the accomodation charge will
be generated along with an invoice no. This allows you to print
out the invoice in advance of the check out if you wish.

![]()
Check out will change the status again on the booking gridd, and will then offer
to print the invoice for the guest.
![]()
This
will simply print out the check in slip for the client (see above).
![]()
Sometimes a situation may arise whereby the room becomes unavailable for the
guest. By clicking the Move To Temp button the guest is assigned
a (non existant) temp room, until another room is obtained. The guest's name
will appear on the booking grid at the bottom under 'Bookings on hold'.
![]()
By clicking on his name you will be prompted to choose a new available room.

![]()
To change the room or booking dates for a guest, click Edit Room/Dates.
A screen will appear to make such changes. Pressing Continue
will update Holiday
Guide as well as MotelMate.

![]()
In the event that a client's name has been mispelt or just needs to be
changed, clicking on edit client name will take you to a screen on which such
changes can be made.
![]()
To add any room extras to a guest's bill, click on this button and you will
be presented twith a list of your hotel items. Click on the add button to add
to the account.
(These can be edited on the Price
List in the Adv Options on the Manager Menu.)
![]()
In the event of a long term booking it may be necessary to invoice in advance
part of the booking. With the Part Bill Booking button
you can enter a date to split the billable duration. An invoice will be
generated for that amount.
![]()
When
you cancel a booking the record will be deleted. A screen requesting your initials
and (optional) reason will appear.
Holiday Guide will be updated with this information also.